
Getting started with creating a VERO
The first step to creating a VERO is getting set up with an Ethereum account
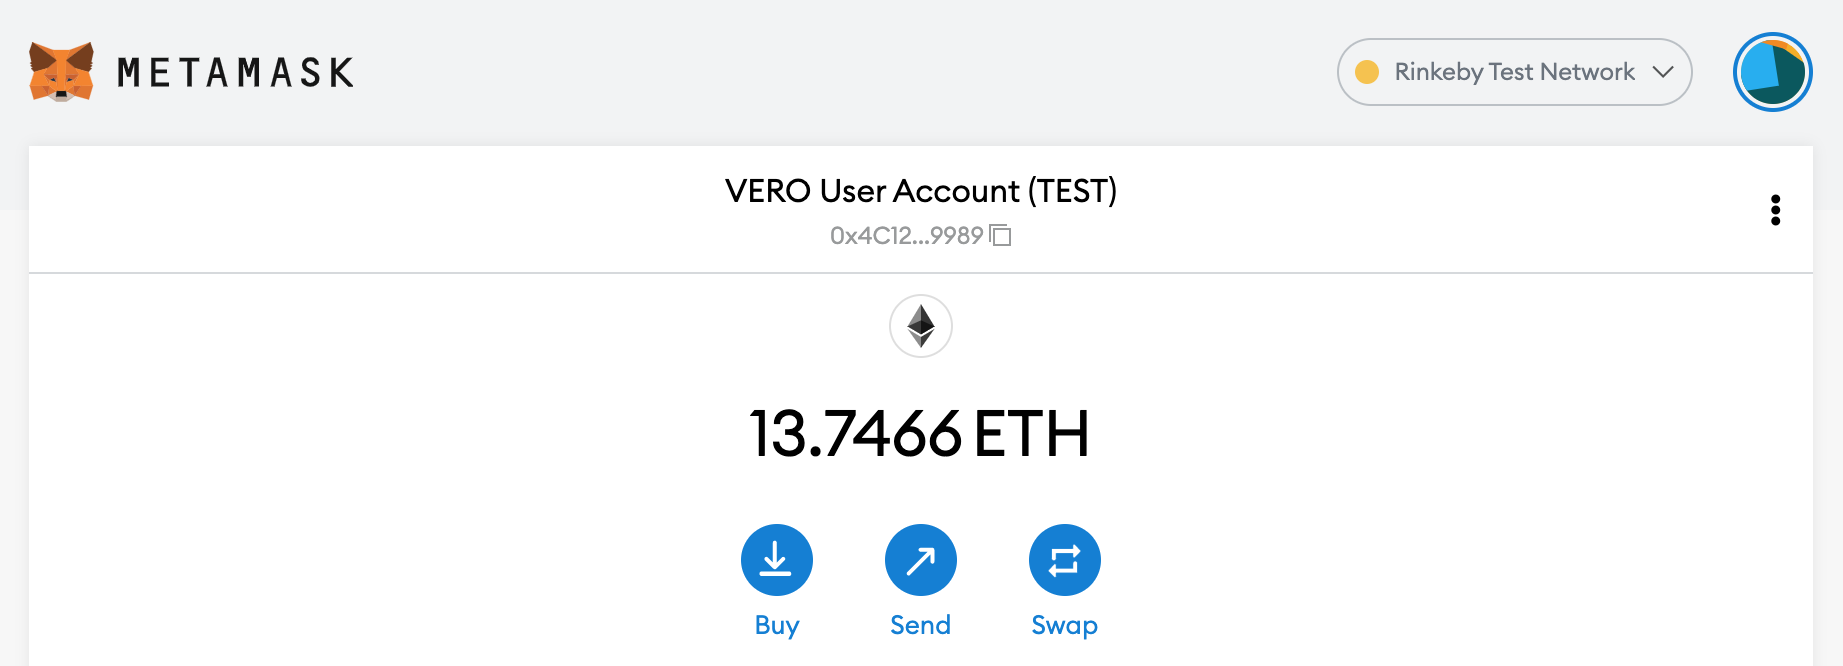
There are a dizzying number of ways to set up an Ethereum account! We suggest getting started with MetaMask and navigating through some blockchain concepts before continuing. Remember that your Ethereum account will act on behalf of the real world owner (you!) and will be the original minter for your VERO. You’ll also want to buy some Ether, the currency of Ethereum, to pay for the gas needed to create your proto-VERO (a legit NFT) and also to pay the VERO Admin Account for the gas that it will use to approve the NFT as a VERO. Gas prices, the amount of gas needed, and the price of Ether all fluctuate with market demands and processing power needed to execute a transaction on the Ethereum blockchain. We will try to give some clues in this guide for how much each one of the transactions may cost with as much granularity as possible.
In this guide, we’ll take you through creating a VERO on an Ethereum test network, in particular the Rinkeby Test Network, which integrates easily with OpenSea for testing. You can use your real Ethereum account here, too, but just apply the transactions against the Rinkeby network. You’ll want to get some test Ether from the Rinkeby faucet right about now. It’s a little idiosyncratic In that you have to post your Ethereum address in a public tweet, then use the URL for the tweet to request test Ether. But, you can remove it after you get your Ether. We don’t want to use real Ether yet, too! Once you finished with this guide, you’ll be ready for the real deal - posting it on the Ethereum mainnet.

My first (test) VERO is a toy truck
Let’s say you are the director of a toy museum and you believe that your toys may have appeal in the VERO market. You want to share the joy of your toys to the people of the world, who may not have a chance to view the real objects in person, but you also need funding to sustain the time, space, and care needed to keep these objects of wonder. You choose to put up a rare, one-of-a-kind toy truck for which you just so happen to have a 3D model as a VERO (Thanks to Free3D for providing a nice selection of free 3D objects to choose from for this guide). Let’s get started.
GUIDE DISCLAIMER
You’ll need to have some tech savviness to create a VERO right now. That’s kind of the name of the game with NFTs. If VEROs are desirable, then creating them will undoubtedly become easier for the tech novice. You’ll also need to have the following things to proceed with this guide.
An Ethereum account assessible by the MetaMask Chrome extension with Ether on the Rinkeby Test Network.
An account on the storage site Pinata.
An understanding that this guide is intended to demonstrate how to create a VERO that meets all of the necessary criteria. This guide will focus on perpetual storage of VERO artifacts using decentralized technology and outside of centralized, discipline-specific databases. This is to keep the steps domain-agnostic and applicable to all. We suggest, when creating real VEROs, to use the best public resources that are available within your particular field.
Preparing object assets and metadata
We’ll be using IPFS (InterPlanetary File System) for a lot of the permanent file storage. From the IPFS site, “IPFS is a distributed system for storing and accessing files, websites, applications, and data.” We will use a site, Pinata, that provides an easy way to graphically add files to IPFS while also pinning the data to a node, so it will stay available indefinitely. Pinata makes storing things on IPFS super easy and low cost (if not free!).
Storing the object assets
Create a new Pinata account, if you haven't already. You will get 1GB free to store and pin on IPFS, which is a nice start. Even as your data needs scale, the cost to use Pinata stays exceptionally cheap compared to the amount of storage used.

Let’s take an image of the toy truck model (toy-truck.png) and upload it to IPFS. The image will be helpful to display the VERO for sale and rudimentary display purposes as rendering a 3D model is not alway practical on the web. Adding the image to IPFS will generate a CID, or file reference hash, QmY8743WQiZ6GTMibdTibHre6CxTW2ofaxCQTTaN9zPonx in this case, that is used to retrieve the image from the IPFS network. The beauty of IPFS is that if you upload the same file again, you will get the same file hash, so data on the network is not duplicated and assured unique. You can grab the image through the HTTPS gateway, https://ipfs.io/ipfs/QmY8743WQiZ6GTMibdTibHre6CxTW2ofaxCQTTaN9zPonx, which is sometimes painfully slow, or retrieve it through a node in the distributed network from the command line or an application that supports the IPFS protocol, ipfs://QmY8743WQiZ6GTMibdTibHre6CxTW2ofaxCQTTaN9zPonx.


Add the 3D model for the VERO to IPFS. We suggest you have your 3D model in either GLB or GLTF (Graphics Language Binary or Graphics Language Transmission Format). When using GLTF format, make sure to have all of the model artifacts embedded within a single file. You can download the convenient freeware 3D software package Blender to easily convert between many different file formats. When uploading the model with Pinata, make sure to select the option “Preserve file name (wrap with directory)”, which retains the file name and file extension. This is required for OpenSea to use their embedded model widget of the NFT.

Storing the metadata
Create an object metadata file in JSON format that contains useful object information for the toy truck. We’ll name it toy-truck.object.json. NOTE: In reality, the schemas and types of metadata used to record salient features of an object are going to be highly differentiated based on your particular discipline. It’s best to use standard conventions and public databases for your field, but in this fictional toy world, they don’t exist. If you believe that IPFS is a stable and reliable means of storing this information indefinitely, you can always use it.
"objectID":"248dd660-5322-4c5e-bdc9-1c6f7f12e1a2",
"accessionNumber":"2018.51 TIF",
"catalogNumber":"T6152",
"objectName":"Toy Truck",
"objectCreator":"Toy Truck Co. LLC",
"objectDate":"1923-10-20",
"repository":"Little Toy Museum, New York, NY",
"objectURL":"https://toymuseum.example.com/object/T6152"
}
Add the object metadata file to IPFS.

Create a token metadata file in JSON format that follows the VERO Metadata Schema. The VERO Metadata Schema extends the standard NFT metadata schema but with additions that allow 3D models to be recognized by NFT sales and auctions sites, like OpenSea. We’ll name it toy-truck.token.json. We’ll list the schema first then the token metadata file below.
"title": "VERO Metadata Schema - extended from ERC721 Metadata JSON Schema",
"type": "object",
"properties": {
"name": {
"type": "string",
"description": "Identifies the asset to which this NFT represents. Required"
},
"description": {
"type": "string",
"description": "Describes the asset to which this NFT represents. Required"
},
"external_url": {
"type": "string",
"description": "A URI pointing to a single, public record for the real object, which lists the real object owner and the unique identifiers. Required"
},
"image": {
"type": "string",
"description": "A URI pointing to a resource with mime type image/* representing the asset to which this NFT represents. Optional"
},
"model": {
"type": "string",
"description": "A URI pointing to 3D model representing the asset to which this NFT represents, which is required to become a VERO. File must be freely available and not behind any access control gating. Required"
},
"animation_url": {
"type": "string",
"description": "A URI pointing to 3D model that will be shown interactively on sites. Use either GLB or GLTF 3D model file formats. Optional"
},
"youtube_url": {
"type": "string",
"description": "A URL pointing to a Youtube video highlighting the VERO. Optional"
}
}
}
"name":"Toy Truck - 248dd660-5322-4c5e-bdc9-1c6f7f12e1a2",
"description":"A VERO for a toy truck (248dd660-5322-4c5e-bdc9-1c6f7f12e1a2) from the Tiny Toy Museum, New York, NY",
"external_url":"ipfs://QmToUvo38idkVPwqW76eLDfZacb4CjPe2B4grU73aoxCwF",
"image":"ipfs://QmY8743WQiZ6GTMibdTibHre6CxTW2ofaxCQTTaN9zPonx",
"model":"ipfs://QmWnjE42P8WAPaG2BRTf1DYo53aNrwjfiWVpqGkoG7xWFQ/toy-truck.gltf",
"animation_url":"ipfs://QmWnjE42P8WAPaG2BRTf1DYo53aNrwjfiWVpqGkoG7xWFQ/toy-truck.gltf"
}
Add the token metadata file to IPFS (screenshot has older file reference).

Almost there now! You’ve finished all of the tedious prep work and are ready to create an NFT that will eventually become a VERO.

What you’ll need to create an NFT that will become a VERO
To create an NFT that can eventually become a VERO for testing, you need the token URI (you just created it above!), the VERO smart contract address on the Rinkeby network, and some Ether in your test account tank. We’ll be using a web-based client-side application to interface with an Ethereum network called MEW (MyEtherWallet), although an older version as the newer one has an annoying bug, along with the MetaMask browser extension to create the NFT against the VERO smart contract in your browser. No programs needed to install or user profiles created for any of this.
Access Ethereum wallet in MEW

Go to the MEW home page and click on Access My Wallet. From this new page, you’ll want to connect to your MetaMask wallet, so click on the MEW CX option.
After confirming access to your wallet, which will include granting access to your test Ethereum account from MetaMask to MEW, you will be taken to the MEW wallet dashboard.
At this point it is very important to confirm that you are operating on the Rinkeby Test Network (RIN) and not the Ethereum mainnet (ETH). Make sure your account balance is in RIN and the network specified is “Web3 Provider(RIN)”.

Create a PENDING VERO with the smart contract
Go to the “Interact with Contract” page by navigating to Contract -> Interact with Contract in the left menu.

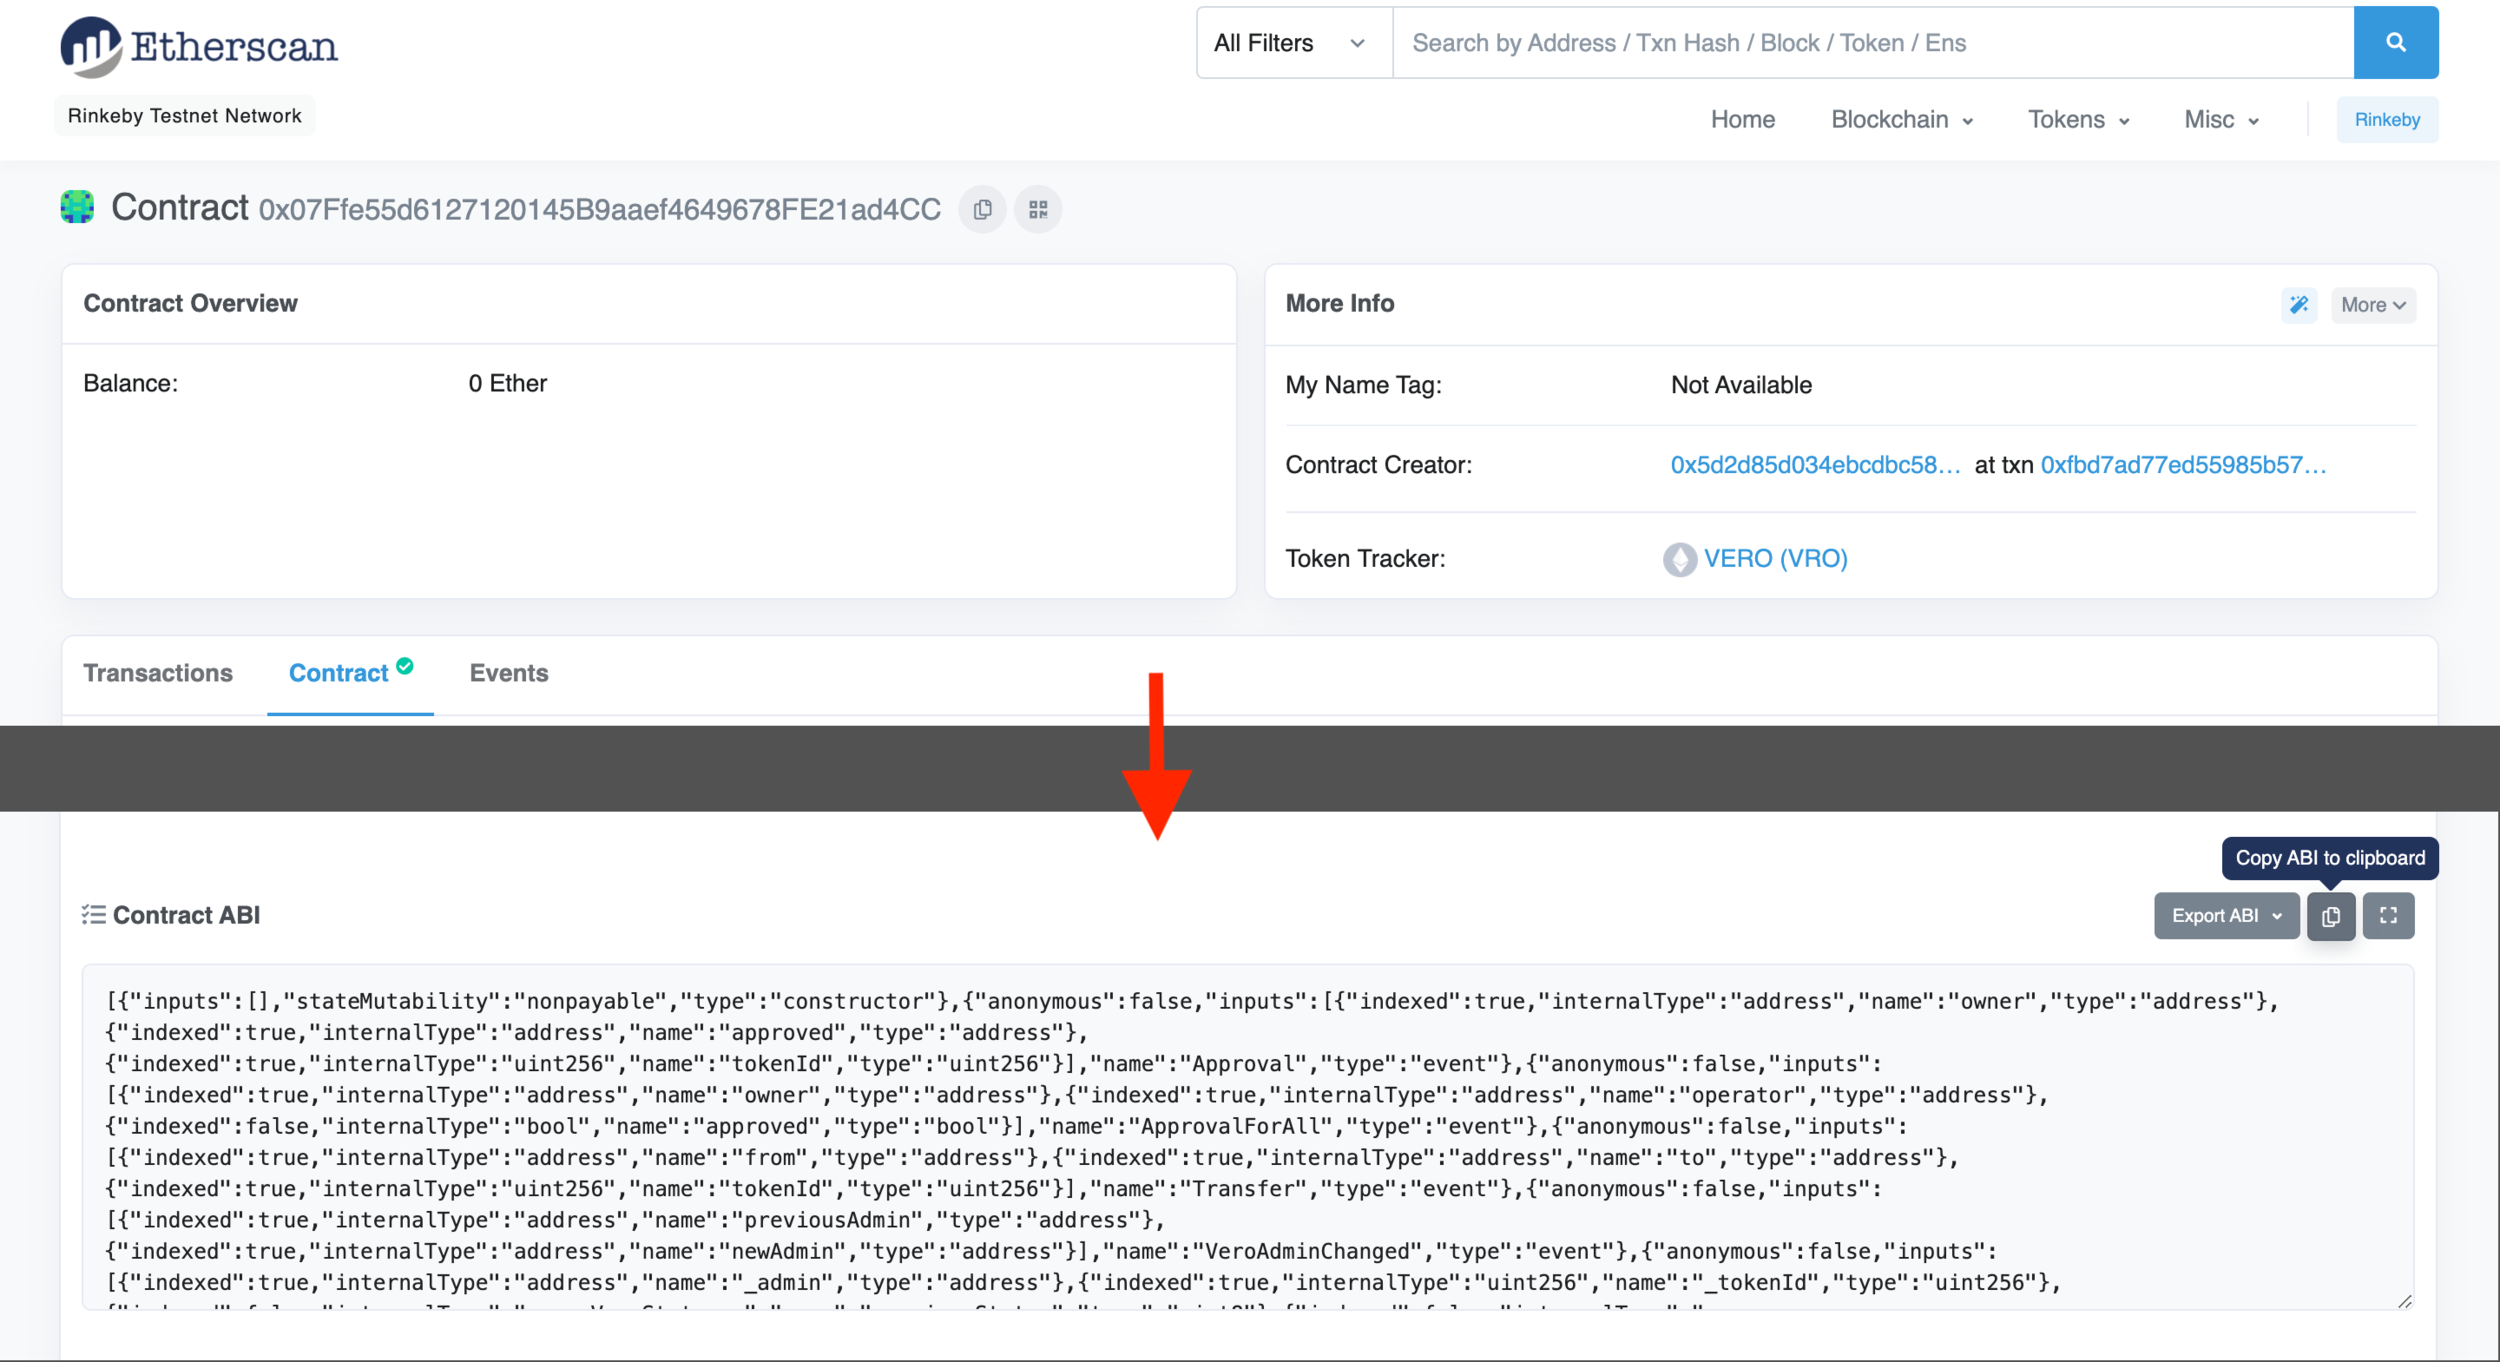
Open in a new browser tab, the VERO smart contract page on Etherscan for the Rinkeby Test Network. Click on the Contract tab, if the above link does not take you there directly. Then scroll down to the Contract ABI section. Copy the value to the clipboard by clicking the copy icon.
Go back to the Interact with Contract page in MEW and paste the contract ABI code in the ABI/JSON Interface field.
Enter the contract address, 0x07ffe55d6127120145b9aaef4649678fe21ad4cc, in the Contract Address field.
Click the Continue button to begin to interact with the contract functions.

Adjust the dropdown to the right of the contract address to the “createAsPending” contract function, which as the name suggests creates an NFT that is in a PENDING VERO status.
Take the IPFS token metadata URI, ipfs://QmU66p2V1QPJrbDwtAGNhgH85mkxcwqDKUxeDc8ZyQpaKX, that you had created in the earlier section and paste it into the _tokenURI field. No need to specify Ether as the smart contract does not require Ether to mint a new token. You will have to be pay gas charges, though, but remember that this is a test network so it's not real Ether.
Click on the Write button to initiate the transaction.
MetaMask will open up with a request to approve the gas needed to fulfill this transaction on the Rinkeby Test Network, which will be the same process when done for real.

Once approved, the transaction is sent off to the network. You can follow along in MetaMask under the Activities tab for your account until the transaction has completed processing on the network.
Conveniently, you can view prior transactions that created a PENDING VERO from Ethereum blockchain explorers like Etherscan. Looking at prior transactions against the VERO smart contract will give you a sense of the gas needed to mint the NFT. With the gas used, you can go to the ETH Gas Station and retrieve the estimated transaction costs. From using test networks, minting a PENDING VERO will use ~333,000 gas and cost around $40. NOTE: Both of these values are bound to fluctuate, so check for yourself prior to minting to get a better idea.
When the transaction has completed, you will have created an honest to goodness (test) NFT! Not quite a VERO yet, but it’s close.

Getting a PENDING VERO approved
There will not be a formal process to follow to get a VERO approved, but make sure that you are fully abreast of the requirements (see checklist) needed for this NFT to become a VERO. We suggest that you reach out to the VERO authors, Sam Bolton or Joe Cora, or start of a conversation in the Discussions tab of the VERO Decisions repo on GitHub if you are looking for additional details or are requesting approval.
Once a PENDING VERO is requested to be approved, the criteria for a VERO will be assessed and the decision, whether approved or rejected, will be publicly shared on the VERO Decisions repo. A rejected VERO can be later approved if information was missed in the initial decision. An approved VERO will only have its status changed if the real object is destroyed or lost, then it will be revoked. It can once again become an approved VERO if the real object is later found or if it is salvaged and permanently stored. NOTE: The VERO statuses are as follows: 0 - PENDING, 1 - APPROVED, 2 - REJECTED, 3 - REVOKED.
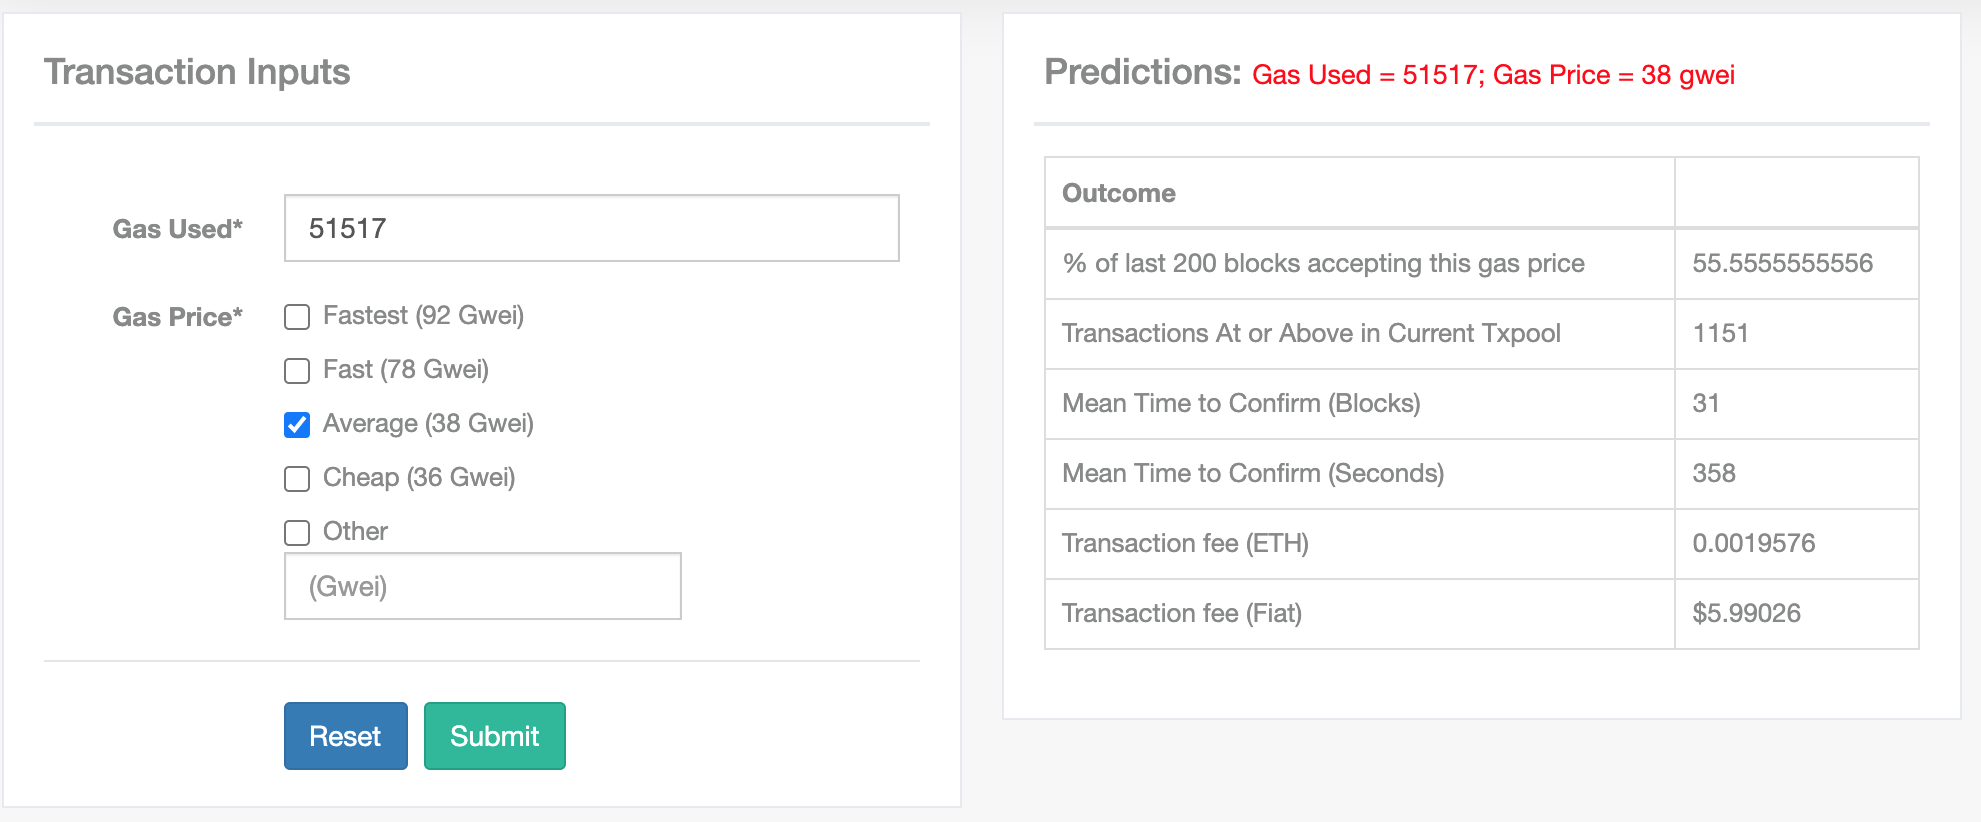
Prior to a decision being made and the status changed, some Ether should be transferred to the VERO Admin Account, 0x77deC79EdB77a22ddC8272e45988599FCFAb32FF. Although this is not a money making endeavor for the VERO authors, we do not want to pay out-of-pocket to process transactions on the Ethereum blockchain to change the VERO status. From using test networks, approving / rejecting a VERO will use ~55,000 gas and cost around $6. Any excess Ether that was transferred to the VERO Admin Account and does not need to be kept there for future gas charges will be transferred back to the original minters. NOTE: Both of these values are bound to fluctuate, so check for yourself prior to requesting approval to get a better idea.
“Selling” your (test) VERO

Although you can sell your VERO on any NFT marketplace or negotiate the sell yourself, we will use OpenSea, which is the most popular NFT marketplace and has native support for 3D models on their NFT pages. Also for testing purposes, OpenSea integrates with the Rinkeby Test Network, which makes trying out the whole process first much easier.

Click the profile icon on the OpenSea home page at the top right and select “My Profile”. This will open the MetaMask Chrome extension to connect your MetaMask test account wallet to OpenSea, so it can access all of your NFTs. We know your wallet includes at least one VERO from above. This will be the same process you followed with MEW earlier.
Click on the VERO you want to put up for sell on OpenSea Testnets, then click the “Sell” button on the top right of the page.

Now that you’re on the Sell page, you have a lot of different options that give you flexibility (set price sells, highest bid auctions, and bundling multiple items together). Explore and see which options work best for you, even though we’re just testing right now.
Once you get your VERO sell options all set up, click on the “Post your listing >” button. This will open up the MetaMask extension again to give authorization to sign the request using your Ethereum account. When you approve, OpenSea will show the processing stages to get the VERO posted.
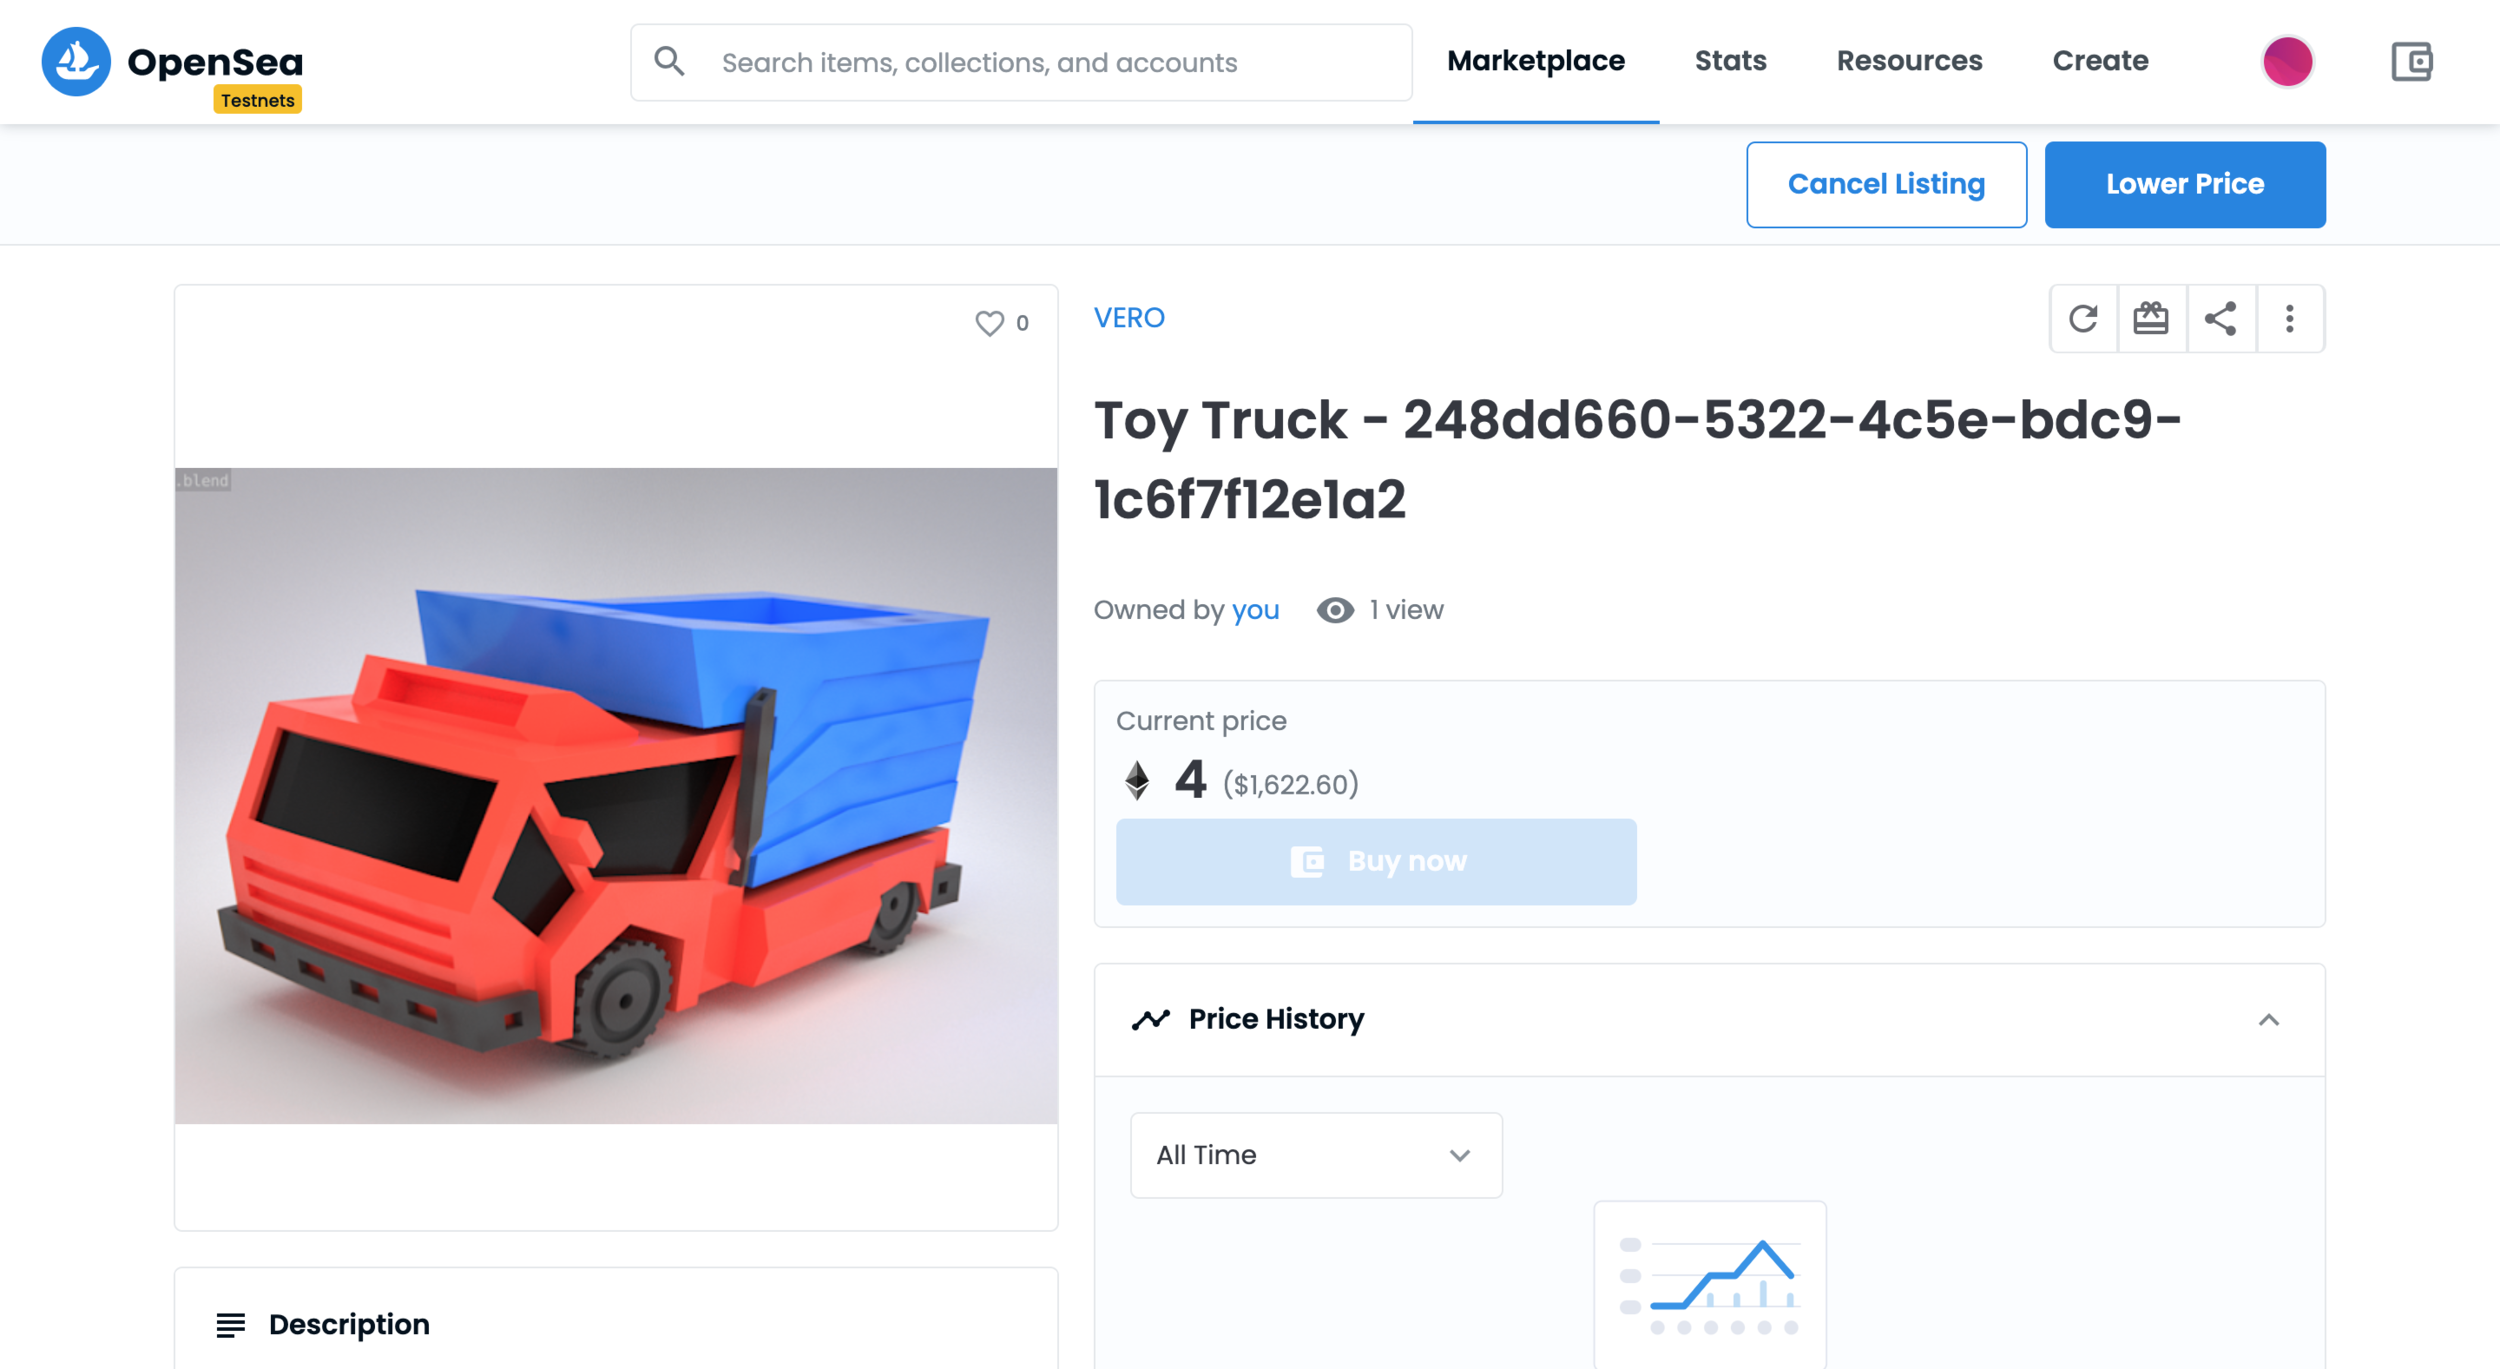
Congratulations! You have posted your (test) VERO on OpenSea that has an interactive 3D model, listing here.
You can follow all of these above steps but use the real Ethereum network, real Ethereum accounts, and real Ether to create a real VERO.